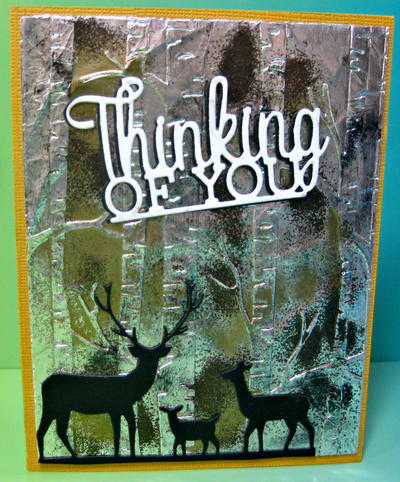
"Thinking of You" Foil Embossed Card
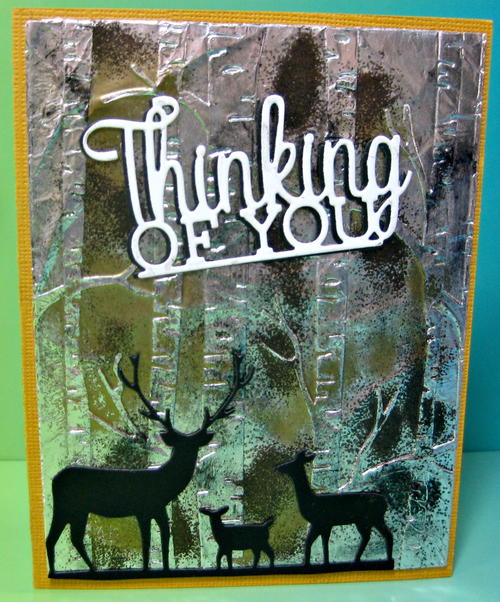
Do you have aluminum foil, embossing folders and embossing powders in your kitchen and craft room? If you do, you have most of the ingredients needed to create the beautiful and unique background shown in this masculine "Thinking of You" Foil Embossed Card.
I discovered this technique in a blog post by Melissa Kerman on her Stampin Up! blog. I gathered my embossing folders, embossing powders, and aluminum foil and I played for hours making beautiful foiled backgrounds with different embossing folders and colors of embossing powder and Staz-On inks.
This "Thinking of You" DIY greeting card features my favorite of the aluminum foil backgrounds I created. The paper craft technique is easy and fun and can be adapted to whatever embossing folders and powders you already own.
Estimated Cost$11-$20
Time to CompleteIn an evening
Primary TechniquePaper Crafts
Project or Page SizeCard
Type of Paper UsedCardstock

Materials List
- Heavy duty aluminum foil
- Black Staz-On Solvent Ink by Tsukineko and Black Ranger Archival Ink
- VersaMark Watermark Stamp Pad by Tsukineko
- Embossing Folder of your choice (I used Stampin’ Up’s Woodlands Textured Embossing Folder)
- Die Cutting/Embossing Machine of your choice
- Embossing Powders of your choice (I used Nuvo Classic Gold and Zing Chestnut Brown)
- Heat Gun
- Sponge
- Memory Box Trio of Deer die
- Thinking of You die by Tonic Studios
- Nuvo Deluxe Adhesive
- Sookang strong two-sided tape
- Gold A2 cardbase, scraps of white and black cardstock
Instructions:
-
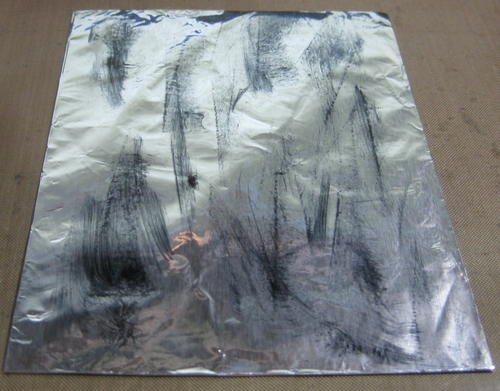
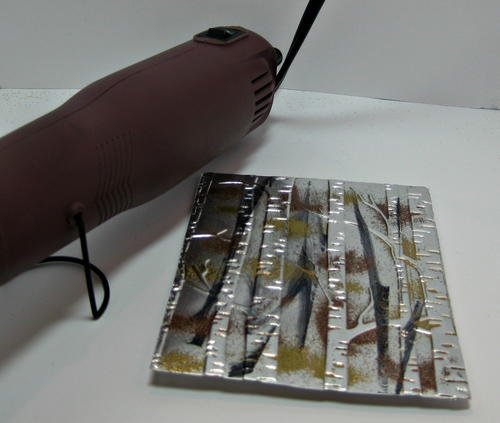
Cut a piece of cardstock the size you want your card front to be and a piece of aluminum foil about one inch wider on all four sides. I recommend heavy duty aluminum foil as it does not tear as easily as the standard weight. Fold the aluminum foil around all four sides, beveling the corners and attaching with strong adhesive.
-
Swipe black StazOn ink over the aluminum foil for some dimension and a grunge look. You can use any color or combination of colors of Staz-On ink, but I chose black for this card. If you do not have Staz-On ink, you can try any archival type ink, but you may have to heat set it so it dries on the aluminum foil. Staz-On dries very quickly on this non-porous surface.
-
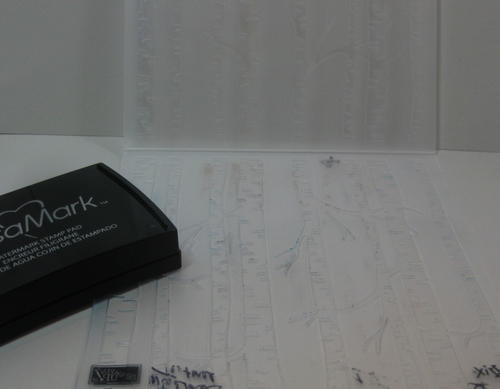
Apply VersaMark ink to one side of an embossing folder. For this card, I have chosen to use Stampin’ Up’s Woodlands Textured Embossing Folder. You can choose which side to put the Versamark on depending if you want your embossed impression to be raised or recessed. I put it on the front side (with the words) so the trees were raised.
-
Put your aluminum foil covered piece face down on the sticky Versamarked side of the embossing folder and run it through your die-cutting/embossing machine using the embossing sandwich.
-
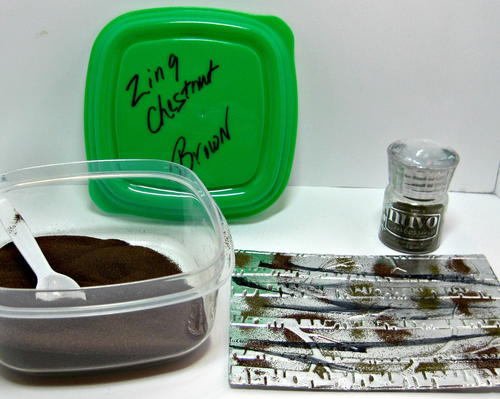
Sprinkle on embossing powders of your choice one at a time. For this card, I used Nuvo Classic Gold and Zing Chestnut Brown. You can choose to use just one color or several colors of embossing powder. Melt them with a heat gun.
-
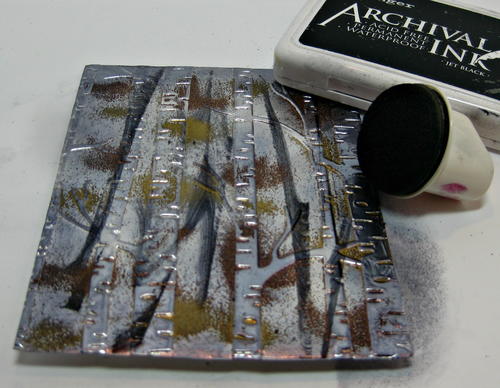
Using a sponge, tone down the silver and highlight the embossing by applying a black archival ink or black StazOn around the edges and as much as you like on the aluminum piece.
-
Attach the finished aluminum background to your card base with strong two sided tape and decorate as you wish. I die cut a family of deer with a Memory Box die. The “Thinking of You” was die cut out of white and black scraps using a Tonic Studios die. I offset them slightly and attached with Nuvo Deluxe Adhesive.
Read NextFree Printable Friendship Card