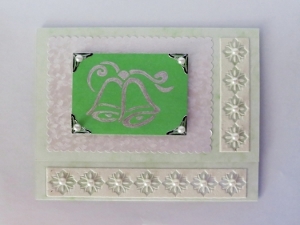
Chiming Bells Wedding Invitation
For centuries, the ringing of wedding bells has been associated with wishing couples happiness on their new life together. The ringing of the bells also symbolizes a day filled with love and joy. Bring this tradition into your own wedding day with the Chiming Bells Wedding Invitation. This wedding card features silver chiming bells on the front of the card and a lace ribbon border and pearl stickers to add some romantic elements. Create an absolutely gorgeous DIY wedding invitations with this tutorial.

Materials:
- A4 Sheet Light Green Marbled Cardstock
- A4 Sheet Worldwin Pearlescent Swirlette Cardstock
- Leaf Green Cardstock
- White Scrapbook Stick-on Ribbon Border
- Four Black-and-Silver Scrapbook Photo Corner Stickers
- Self-Adhesive 3mm Pearl Stickers
- 3d Self-Adhesive Foam Squares
- Versacolor Silver Ink Pad
- Jablo’s Chiming Bells Stamp, X 032 (See www.jabtex.Cco.za for International Stockists)
- Pilot Silver Marker Pen
- Glue
- Ruler
- Pencil
- Scissors
- Scallop Pattern Edged Scissors
Instructions:
1. Cut a piece sized 7” x 11.5” from the light green marbled cardstock. With the longer side on the left, score the bottom of this piece of cardstock 2” from the bottom (hereafter referred to as the first fold) and 4.1” from the top (hereafter referred to as the second fold).

2. Add the stick-on ribbon border just above the first fold of the card, as well as to the right side of the card below the second fold.
3. Use the self-adhesive pearl stickers to add some detail to the stick-on ribbon border.

4. Use the pattern edged scissors and cut a piece from the Pearlescent Swirlette cardstock. Once it has been cut, the size of the cardstock must be 3.4” x 5”.
5. With the second fold at the top, add the piece cut from the Pearlescent Swirlette paper to the front of the card.
6. Cut a piece sized 2.4” x 3.4” from the leaf green cardstock.
7. Use the stamp pad to apply an even layer of the silver ink onto the Jablo’s stamp. Transfer the image onto the piece of leaf green cardstock and then carefully lift the stamp. Allow the stamped image to dry thoroughly before continuing with the next step.
8. Add four photo corners to the piece of leaf green cardstock. Highlight each photo corner with a self-adhesive pearl sticker.

9. Use the Pilot silver marker pen to highlight the stamped image.

10. Use the 3D self-adhesive foam squares to affix the leaf green cardstock with the printed image to the front of the card.