How to Marble Paper: Two Methods

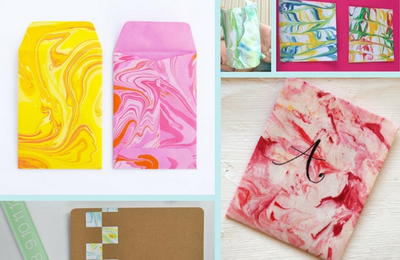
Marbled paper can be incredibly gorgeous. Traditionally found in book bindings, more and more people are marbling their own paper for some cool wall art. Once you've created your design, there are several cool marble paper crafts you can make, from envelopes and other stationary to notebook covers.
Marbling can trace its roots back to 12th century Japan with suminagashi, or "ink floating." The Japanese used sumi inks that floated on the top of the water and created designs by blowing on the water. From Japan, the art of marbling moved through southern Asia, to Persia and then Turkey. This is where the marbling style known as ebru, or "cloud," was born in the 15th century. It was through Turkey and Turkish marbling that the art technique made its way into Europe.
Marbled paper was often used for important documents to prevent forgeries because each result is as unique as a fingerprint. Though marbled paper was quite popular, it wasn't until Charles Woolnough published The Art of Marbling in 1853 that it became an accessible art for anyone to attempt. Before that, the secrets of paper marbling were closely guarded.
Today, paper marbling is as popular as ever, and something just about anyone can do. There are two methods for marbling your own paper: water marbling and shaving cream marbling. Historically, water is how paper has been marbled, but if you're not afraid of a little mess, the shaving cream method can be quite fun. If you're more experienced or are working on bigger paper, use the water method. The shaving cream method is great for kids.
The Water Method
Materials
- Medium-weight absorbent paper
- Oil paints
- Methyl cellulose
- Alum
- Tray or shallow bin
- Water
- Stirrer
- Newspaper
Instructions
1. Start by mixing your water with the methyle cellulose (1/4 cup for every 2 quarts of water) in order to thicken it. The thickening process takes about an hour. According to Mandi Johnson in a guest post for A Beautiful Mess, the thickening process takes about an hour, and for the best results, make sure you stir the water every 10 minutes to prevent clumping.
2. While you're waiting for your water to thicken, you can start preparing your paper. While this step isn't always necessary, it does help your paper retain more of the ink for a bolder design. Prep your paper by mixing 1 tablespoon of alum with 1 cup of water and wet one side of your paper. Leave the paper to dry. You will want to make sure you prep all of your paper now so you don't have to wait for a new paper to dry every time you want to make a new design. Paper marbling can be very relaxing and there's a good chance you'll want to go through a whole stack.
3. Once the paper is dried, iron it so that it's as flat as possible. If there are any wrinkles, the design won't go on as well.
4. Drop a few drops of the paint in the water and swirl. While any paints can be used, oil works best because it floats. If you want to use a heavier paint, like acrylics, make sure you thicken your water more.
5. Once you've achieved your desired pattern, gently lower your paper onto the surface of the water and let it sit for a few moments. Lift it carefully and set it on newspaper to dry.
Tips
Kate from Minie Co recommends using a piece of cardboard to "scrape" the surface of the water after each round to get rid of the paint residue.
After it's dry, you can press it between books to flatten the paper.
Your paper doesn't have to be white. Use a colored paper for a pretty background. If you do this, use a transparent paint along with your normal paint so the color of the paper shines through.

The Shaving Cream Method
Materials
- Shaving cream
- Shallow container
- Liquid watercolor paint
- Droppers
- Scraper
- Cardstock
Instructions
1. Make sure you set out all your supplies beforehand. This method gets messy fast and you don't want to figure out you forgot a crucial step once your hands are already covered in shaving cream.
2. Fill the container with shaving cream. Spread it out so the surface is even.
3. Drop the paint on the surface. Swirl.
4. Press your paper in and lift it out immediately.
5. Scrape the shaving cream from your paper. Do this quickly or the paper will become soggy. Lay it out to dry.
Tips
Jean Van't Hul from Artful Parent says it's important to make sure you get foamy cream, not gel. Men's is typically foamier, and generally cheaper as well.
Feel free to experiment with different kinds of paint. You can even try food coloring!
Keep an empty bowl on hand, Jean recommends. You can use to store the excess shaving cream you scrape off your paper.

Read NextHow to Seal Paper Crafts
Your Recently Viewed Projects
Thanks for your comment. Don't forget to share!
jadoredior
Jul 17, 2017
I've been seeing marbled stationary everywhere, so this is something I've been wanting to try out. Thanks so much for the ideas!
Report Inappropriate Comment
Are you sure you would like to report this comment? It will be flagged for our moderators to take action.
Thank you for taking the time to improve the content on our site.