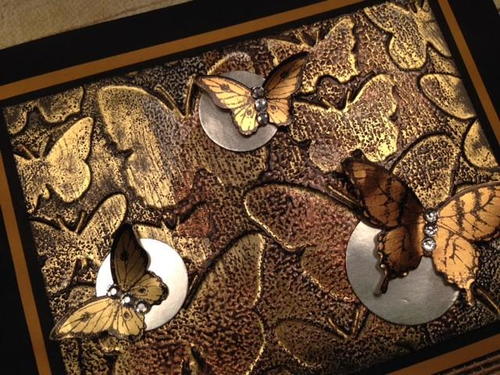
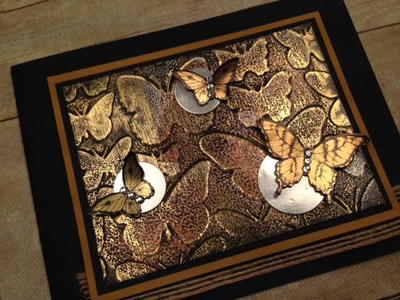
Impressions of Tarnished Foil Butterfly Card

Melissa Kerman's Impressions of Tarnished Foil technique has evolved since her first creation which was made using aluminum foil wrapped around cardstock. Her later versions of the technique, including the handmade card here, were created using foil sheets by Stampin' Up!
There are pros and cons to both. Using foil sheets saves a few steps plus they are more durable. The foil sheets also come in silver, copper, and gold and therefore offer more opportunities for creativity. The paper craft project here uses a Gold Foil Sheet by Stampin' Up and the result is a spectacular tarnished foil background on her metallic butterfly card.
Estimated Cost$11-$20
Time to CompleteIn an evening
Primary TechniquePaper Crafts
Project or Page SizeCard
Type of Paper UsedCardstock

Materials List
- Stampin’ Up Gold and Copper Foil Sheets
- Black Staz-On Solvent Ink by Tsukineko
- VersaMark Watermark Stamp Pad by Tsukineko
- Stampin’ Up Gold and Copper Embossing Powder
- Stampin’ Up Fluttering Textured Impressions Embossing Folder
- Heat Tool
- Big Shot Diecutting/Embossing Machine
- Dimensionals
- Burlap Ribbon
- Black cardstock base, layers of gold and black cardstock
- Stampin’ Up Silver Foil Circles and Butterfly Punches
- Stampin’ Up Butterfly Stamps
- Crystal gems
Instructions, Written by Karen Hasheck:
-
Apply black Staz-On directly onto the gold foil sheet, rubbing to create linear streaks for texture and interest in the background.
-
Place a piece of scrap paper over the top of the Staz-On streaked foil and place it in the embossing folder of your choosing. Melissa suggests adding the scrap paper piece to prevent any staining of the embossing folder. She chose a butterfly embossing folder from Stampin’ Up called Fluttering Textured Impressions.
-
Using a Versamark inkpad, rub the edge of the pad randomly in a variety of spots on the dry embossed piece to vary where the embossing powder will stick. Pour gold embossing powder on the Versamarked piece, rubbing some off to blur any Versamark lines or if there is too much in any area. Melt with a heat gun.
-
Repeat step 3 using copper embossing powder.
-
Apply black Staz-on directly to the embossed foil to highlight the contrasts between the raised and recessed areas and add an old, rustic, tarnished look- thus the name of this technique-Impressions of Tarnished Foil.
-
Attach the completed foil piece to black and gold layers. Raise it with Dimensionals over a burlap ribbon on a black cardbase.
-
Stamp butterflies on scraps of copper and gold foil sheets, punch out with butterfly punches and attach on silver foil circles with crystal gems.
See more of Melissa's creations by visiting her Stampin' Up! blog.
Read NextFree Printable Friendship Card
Your Recently Viewed Projects

Thanks for your comment. Don't forget to share!
KLC
Apr 18, 2017
I love the tarnished look. Of course, butterflies are always beautiful so this is a gorgeous card!
Report Inappropriate Comment
Are you sure you would like to report this comment? It will be flagged for our moderators to take action.
Thank you for taking the time to improve the content on our site.