This project was submitted by one of our readers, just like you.
How To Make A Fun Summer Scrapbook Layout

How To Make A Fun Summer Scrapbook Layout
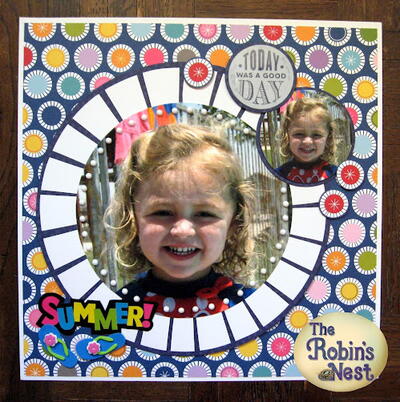
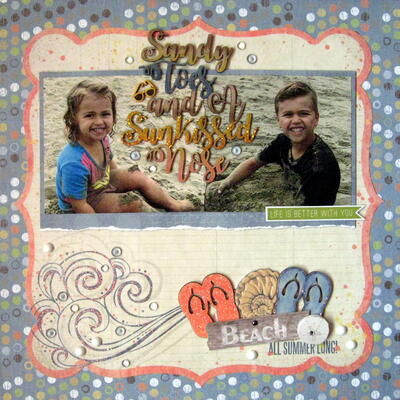
From the designer: "Come see how simple it is to make a fun summer layout. Make a faux frame of Dew Drop Gems along the edge of the main photo. You can create various looks by changing how close you space the Dew Drop Gems. Create embellishments by mimicking designs in the scrapbook paper which can serve to unify the layout by adding similar elements. After you plan the placement of the layout, take a photo of the arrangement. To avoid undue frustration it really helps to have the photo to refer to as you attach everything in place. "
Time to CompleteIn an evening
Primary TechniqueScrapbooking
Project or Page Size12 inches x 12 inches
Type of Paper UsedScrapbook Paper

Materials List
- photo 8x10" & 4x5" patterned paper white & blue card stock
- circle punch or die cutting machine
- embellishments: title & flip flops
- tools: double sided tape, liquid adhesive, scissors
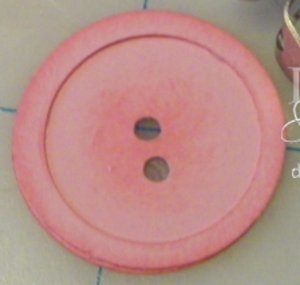
- white round Dew Drop gems (The Robin's Nest)
Instructions
-
Trim .25" off 2 sides of patterned paper. Matte the trimmed paper with white card stock.
-
Mimic the design element on the scrapbook paper by creating a similar circle frame. Snip 2" along the edge about every 1.25" Next, matte the sliced circle with blue card stock.
-
Crop the 2 photos into circle shapes. Adhere the large photo onto white & blue circle.
-
Place the photo onto the layout and lightly mark with a pencil the area of paper that will be hidden behind the photo and can be removed. Cut out that section with a craft knife. Carefully cut out any elements in the paper that can be used to embellish the layout.
-
Then, adhere the photo to the layout.
-
Create a cluster in the upper right corner with a small circle photo. Add a large title and summer embellishments.
-
Finally, adhere white Dew Drop Gems with liquid adhesive along the edge of the large photo. Space the white Dew Drops about .25" apart in order to reflect the design on the background paper.
NotesBe brave and crop your photos into non-rectangular shapes like circles, hexagons, or triangles. Changing the standard expectations can make your layouts extra special.

Read NextMini Eco-Friendly Scrapbook