Pirate Jack's Liquor Bottle Craft
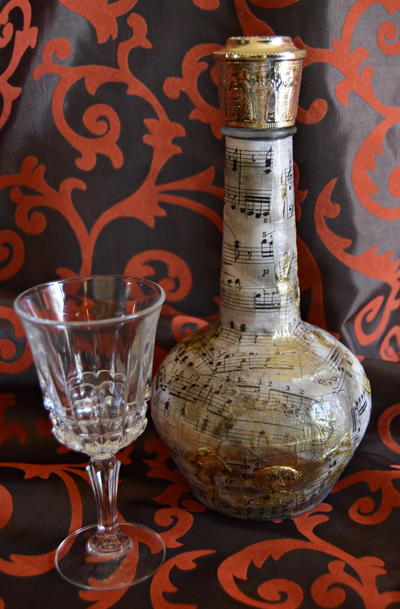
If you are planning to host a pirate party anytime soon, whether it's for a birthday, Halloween, or just because, then this Pirate Jack's Liquor Bottle Craft is just what you need. When your guests feel it is time to wet the pipe, bring out liquor served in this pirate-themed liquor bottle.
This sheet music craft is fun and useful, involving decoupage and mixed media techniques anyone would enjoy. It adds a fun element to your DIY party decor and will make your guests all go: "Ahoy matey!"
Estimated Cost$11-$20
Time to CompleteIn an evening
Primary TechniqueMixed Media
Type of Paper UsedTextured Paper

Materials List
- Empty clear glass liquor bottle with screw cap
- Ornate silver metal screw cap that would fit on the bottle
- 2-3 A4 sized music sheets
- Mod Podge
- Kaisercraft bronze ink glimmer mist
- Rolkem gold dusting powder
- Pattex contact adhesive glue
- Quick-drying matt clear spray varnish
- Candle and box of matches
- Paintbrush
- Scissors
- Hairdryer
- Small plastic bowl
Instructions:
-
Cut rectangles from the music sheets. Note: Depending on the stiffness of the paper the music sheets are printed on, and the curviness of the bottle, you might need to cut small slits into each rectangle to help you to drape it more easily around the bottle.
-
Paint Mod Podge to the back of the first rectangle cut from the music sheet. Turn the rectangle over and put it in position on the bottle.
-
With the brush, spread Mod Podge to the front of the rectangle, applying pressure so that it will stick to the bottle, and use your finger to gently rub out any air bubbles.
-
Repeat steps 2-3 with the other rectangles until the bottle has been covered. Keep the area where the cap will be screwed on and the base of the bottle naked, but make sure that you add rectangles all the way up to the collar of the bottle.
Use the hairdryer to dry the bottle. Do not use the highest heat setting on the hairdryer, as the bottle might become too hot to handle. -
Paint a layer of Mod Podge over the bottle and dry the bottle with the hairdryer again. Remember not to apply Mod Podge over the naked areas.
-
Repeat step 5 ~ you need to apply at least 5 coats of Mod Podge, but with every layer, the direction in which the Mod Podge is applied, must be changed from horizontal to vertical to horizontal, etc. Remember that after every layer of Mod Podge, the bottle must first be dried thoroughly with the hairdryer.
-
Time to create some vintage texture! Light the candle first. Apply Pattex to random areas on the bottle. While the glue is still wet, use the candle’s flame to set it alight, and then quickly blow out the flame. Keep setting it alight and blowing out the flame until the desired effect is obtained.
-
Age the bottle further with the candle’s smoke. Light the candle and bring the candle closer to the bottle. Drag the candle along certain areas of the bottle in a circular motion. You will see darker shapes forming on the surface of the bottle. Do not hold the candle too close to the bottle.
-
Spray some of the ink mist into the plastic bowl and use a paintbrush to apply ink mist to certain areas. Then, brush gold dusting powder over the burned Pattex and also to some random areas of the bottle.
-
Spray the bottle with the varnish and allow to dry thoroughly. Note: Do not allow any varnish to come in contact with the area above the collar of the bottle.
-
Fill the bottle with your favorite liquor and you are ready to say: "Ahoy Matey!"


