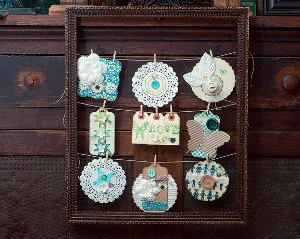
Rustic Picture Frame Wall Art
Decorate your house with home decor crafts when you make the Rustic Picture Frame Wall Art. This gorgeous DIY wall art is a fantastic upcycling project for any old picture frame. Use your favorite paper punches and DIY embellishments to decorate this beautiful frame. You can make it holiday themed or evergreen depending on your choice of patterned papers and embellishments. Amaze your guests when you decorate your home with this lovely frame.

Materials:
- Fuse Creativity System® Starter Set
- Medium Design Set 101890 - Curvy Square
- Medium Design Set 100780 - Circle
- Medium Design Set 101060 - Butterfly
- Medium Design Set 101880 - Tag
- That’s Amore Squeeze Punch (Medium)
- Seal of Approval Squeeze Punch (Large)
- Threading Water Border Punch
- Stamp Block Set
- Butterfly Magic Clear Stamps (4"x8")
- Patterned Papers
- Buttons
- Flowers
- Paper Doilies
- Adhesive
- Sewing Machine (optional)
Instructions:
1. The basic construction of each of these involves die cutting a shape and layering smaller punched shapes and other small embellishments on top of the die cut. A small make up sponge that has been dabbed on the surface of a brown stamping ink pad can be used to lightly brush the edges of the shapes to give them added depth and the look of worn, aged paper.

2. For the first tag, I used the Curvy Square Design Set with the Fuse and the medium Hexagon Squeeze Punch with paper from Authentique Paper, adding a Prima Hexagon 'Say it in Crystals' sticker and a large Prima Cabriole White flower. A scrap of crocheted trim and a small button complete it.

3. On my second tag, I used a small paper doily embellished with Authentique paper and another Prima Hexagon 'Say it in Crystals' sticker.

4. The third tag was created using the Scalloped Circle Design Set, the XL Seal of Approval Squeeze Punch, and the Heart popup punch.

5. To make the flower on this tag, I just took a piece of trim, applied glue along the length of it, and loosely rolled it up.

6. For the fourth tag, I used the Tag Design Set and the Jenni Bowlin Quilt Star Squeeze Punch, adding some tiny Prima Cabriole White flowers to each punched shape.

7. The 5th tag was made by machine stitching 3 small shipping tags together, stamping them with the Butterfly Magic stamp set and adding another small Prima flower.

8. Again, the Tag Design Set was used and the die cut, which was cut from Cosmo Cricket paper, was embellished with a punched border from the Threading Water border punch, and another die made using the Butterfly die.

9. For tag number 7, I started with another small paper doily and the Butterfly Magic stamp set. Adding a punched heart and an epoxy brad completed it.

10. The 8th tag was made by die cutting a piece of old book paper with the Scalloped Circle Design Set. Layering a tag die cut embellished with a Threading Water punched border, another Prima flower, a medium That's Amore punched heart, and some buttons left the tag complete.

11. The final tag is a simple one made by die cutting Authentique paper and adding a length of lace trim and a large button. A stick pin and a punched heart were used to finish the tag.

12. After pushing thumbtacks into the back of the frame and stretching twine between them to create hangers, the tags were each hung from the twine using tiny clothespins.
Starting with a free frame and a few inexpensive paper crafting supplies, I ended up with a delicate and pretty home decor piece!
Read NextDiy Paper Flower Backdrop

Thanks for your comment. Don't forget to share!
Michele
Jun 16, 2016
I'm currently looking for affordable ways to decorate my new apartment this is going on the list for sure!
Report Inappropriate Comment
Are you sure you would like to report this comment? It will be flagged for our moderators to take action.
Thank you for taking the time to improve the content on our site.