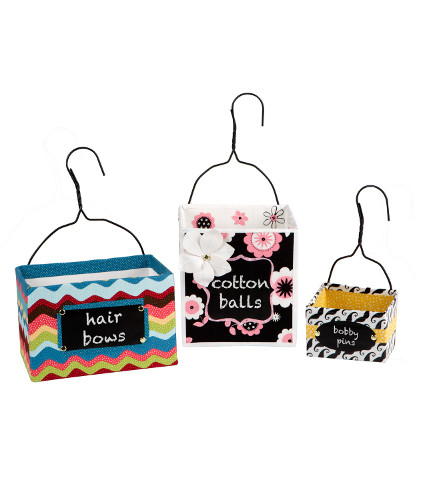
Organizing Hanging Boxes
Store your paper craft supplies in style with these Organizing Hanging Boxes. Duct tape craft ideas like this one are fantastic because they're fun to make and they have a practical use. Start with a basic cardboard box and decorate it with Duck Tape to match your craft room. With the help of trendy chalkboard labels, you'll be able to sort your craft supplies easily (and find them easily, too)! The hangers are a great way to organize because you can hang the boxes in a craft closet. Get organized in a crafty way with this tutorial.

Materials:
• Duck Tape®
• Duck Fabric® Sheets
• Duck Fabric® Rolls
• Duck Fabric® Mini Rolls
• Duck® Brand Chalkboard Deco Adhesive Laminate
• Cardboard box
• Scissors
• Brads
• Pen
• Crafting board
Instructions:
- Cover both the inside and outside of a cardboard box with Duck Tape®. Make sure the top of the lid is removed before beginning.

- Cover the outside and inside using Duck Fabric® crafting tapes and sheets. Set this aside once finished.

- Draw a design for your label on the back of your chalkboard laminate sheet. Cut it out.

- Make a Duck Fabric® sheet that is slightly bigger than the label you made in step 3. For easier application, lay your strips down on wax paper or on the back of a Duck Tape® Sheet.

- Adhere your chalkboard label to the top of the sheet from step 4. Cut it out, leaving about an inch of the fabric showing around the edges."

- Place your label on the front of the covered box. Add brads to the corners if desired.

- Cut the bottom off of a hanger. You may need help from an adult to do this.

- Attach your hanger to the inside or outside of the box.

- Repeat steps 1-9 to create more fun and unique boxes!

Read NextFaux Wrapped Map Canvas