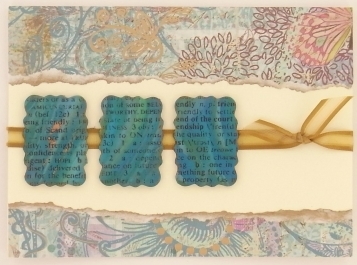
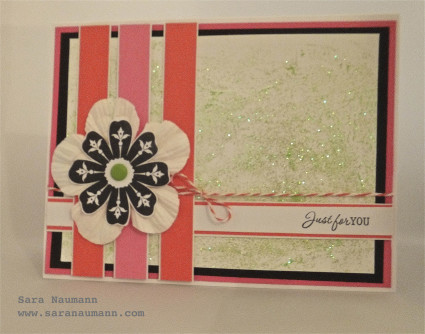
Crinkle Cutter Clay Tile Card
Use new and unique card making techniques in your paper crafting when you create clay embellishments. Clay crafts like the Crinkle Cutter Clay Tile Card are such exciting projects! Give your clay a marbled look by the technique outlined in this tutorial, and grab your favorite text stamp to add words to the marbled embellishment. Once you have the pieces, your handmade card will come together in a snap. Add a new media to your paper projects when you create this card.

Materials:
- 1 block of Premo! Accents: Peacock Pearl - 2 oz
- 1 block of Premo! Accents: Green Translucent - 2 oz
- 1 block of Premo! Accents: 18K Gold - 2 oz
- 1 block of Premo! Sculpey®: Turquoise - 2 oz
- Clay Conditioning Machine
- Premo! Sculpey® Crinkle Cutters
- 5 ½” x 4” Ivory Colored Blank Greeting Card
- 1 Piece of Blue Print Scrapbook Paper
- 10” Gold Ribbon
- Rubber Stamp with Words (Hero Arts Friends Stamp Shown)
- StazOn Ink – Black and Gold
- Strong White Craft Glue
- Craft Knife
- Adhesive Runner for Paper
-
Unlined Index Card
Instructions:
1. Using ¼ block of Peacock Pear, ¼ block of Turquoise, 1/8 block of Green Translucent and 1/16 block of 18K Gold form separate coils of each.

2. Twist and fold clays to get a marbled look.

3. Pass the marbled clay through the pasta machine on the widest setting, fold and pass through the pasta machine on the middle setting.

4. Lay the sheet of clay on an index card and using the black ink stamp the words on the clay.

5. Using the rectangle crinkle cutter, cut out 3 tiles.

6. Bake tiles according to package directions; allow to cool.
7. To assemble card: use the gold stamp pad, ink the edges of the tiles.
8. Rip blue paper and ink edges with gold.
9. Assemble card as shown in photo, trimming paper as needed.
10. Use strong white glue to adhere tiles; allow to dry.
Read NextOne-Sheet Printable Pop-Up Cards