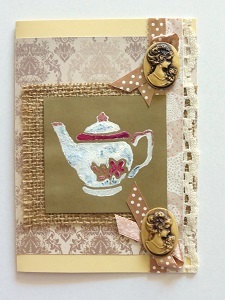
Burlap and Cameo Vintage Card
Find your card making inspiration from times gone by! Create a handmade birthday card with a vintage feel by using classic elements and stamping techniques. The Burlap and Cameo Vintage Card is reminiscent of an era associated with relaxing tea parties, a time when birthdays were celebrated with a social gathering in the Spring garden. Bring that Spring garden into your loved one's life when you send this beautiful card. Homemade birthday card ideas like these are sure to be cherished by any recipient.

Materials:
- 12” x 12” sheet from Vintage Christmas Paper Pad (Product Code CO723551) from www.couturecreations.com.au
- 8.2” x 5.6“ Vanilla-Colored Cardstock
- 3.7” x 3.1” Natural Hessian (Burlap)
- 2.5” Square Cut from Antique Bronze Colored Paper
- Two 1” Long Resin Cameos
- 1” Wide Cream-Colored Lace
- 0.5” Wide Matching Belt Ribbon
- 0.3” Wide Brown Satin Ribbon with White Polka Dots
- Jablo’s Tea for One Teapot Stamp, G035 (See www.jabtex.co.za for International Stockists)
- White Acrylic Paint
- Two Shades of Pink Craft Foil
- Foilart Super-tack Glue Pen
- Artline 210 Fineliner Pen
- Fine Paintbrush
- Pair of Standard Scissors
- Quick Drying Glue
- Pencil
- Ruler
Instructions:
1. Score the 8.2” x 5.6” vanilla-colored cardstock in half to create a card sized 5.6” x 4.1”.
2. Cut a piece sized 4.7” x 4.1” from the Vintage Christmas scrapbook paper. With the fold at the left, centre and glue the scrapbook paper to the front of the card.

3. Centre and glue the 3.7” x 3.1” natural Hessian (burlap) to the front of the card.
4. Glue the lace to the right of the card. Glue the belt ribbon in place just to the left of the edge of the lace. Finally, glue the satin ribbon with polka dots to the left of the belt ribbon, slight overlapping the belt ribbon. Cut off any protruding edges at the top and bottom of the card.

5. Use the paint brush to apply an even layer of the white paint onto the teapot stamp. Transfer the image onto the antique bronze colored paper square and then carefully lift the stamp. Allow the stamped image to dry thoroughly before continuing with the next step.
6. Add Super-tack glue to the areas of the teapot that must be highlighted with the craft foil. Allow the Super-tack glue to dry for about 20 minutes. When the glue is wet, it is blue, but when it is dry it becomes transparent.
7. Press foil down on the glue. Remember that – of course - the pink side of the foil must be on top. Rub the foil over the areas where you have added glue with the Super-tack glue pen. Carefully lift the foil. On the areas where you have added glue with the Super-tack pen, some of the foil will stay behind, thereby highlighting certain areas or features of the stamped teapot.
8. Now give the teapot an aged look. Use the Fineliner Pen to make a few small black spots on the teapot. Immediately brush over the spots with white acrylic paint the paint will cause the black ink to flow, so that it will look a sif the teapot is made form aged porcelain. Allow to dry thoroughly.

9. Centre and glue the square with the teapot to the front of the card.
10. Make a loop with a piece of satin ribbon and glue it in place in the top right corner. Neatly cut the ribbon ends and glue them to the card. Make a second loop for the bottom right corner.
11. Glue the cameos in place over the ribbon loops.