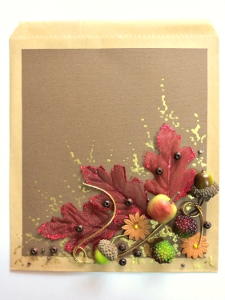
Ornate Thanksgiving Dinner Invitation Sleeve
Start your Thanksgiving family dinner with an invitation that will set the mood for a night of fine dining. The Ornate Thanksgiving Dinner Invitation Sleeve is a fabulous Thanksgiving craft that will dress up all of your party invitations. Use an ordinary brown paper bag to create this gorgeous project. Make an arrangement with some Thanksgiving symbols and beads, and add the final touches with some pale gold paint. These invitations are sure to be the talk of the party. Just don't forget to be thankful! Your Thanksgiving celebration is sure to be festive with these envelopes.

Materials:
- 8.4” x 7.1” Brown Paper Bag
- 7 x 6.3” Brown Cardstock
- A4 Sheet of Vanilla Colored Paper
- Three Red Faux Oak Leaves
- Two Faux Youngberries
- 1 Faux Apple
- Two Faux Acorns
- Two 1” Sized Brown Colored Paper Daisies
- 11 Small Brown Wooden Beads
- 5 Brown Seed Beads
- Golden Twine
- Pale Gold Acrylic Paint
- 2/32” Paintbrush
- Quick-drying Craft Glue, such as Bostik Clear
- Standard Scissors
Instructions:
1. Center and glue the brown cardstock to the front of the bag.

2. Glue the three oak leaves to the bag.

3. Make an arrangement with the faux apple, youngberries, acorns and paper daisies.

4. Glue the wooden beads and the seed beads in place.
5. Make a knot or two in the twine, and then twist the twine through the arrangement. Secure with a few drops of glue.
6. Add some detail with the pale gold paint.
7. Allow to dry on a flat surface for one to two hours.
8. Compile a document containing the information for the dinner party on your computer, using a font such as Edwardian Script if working in Word for Windows.
9. Print the invitation on vanilla colored paper. Cut it to the correct size and add it to the bag.
Read Next17 Craft Ideas for Thanksgiving