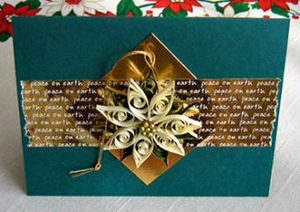
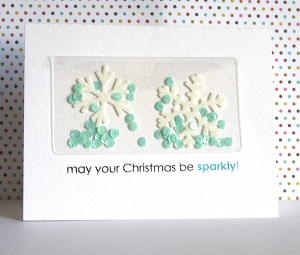
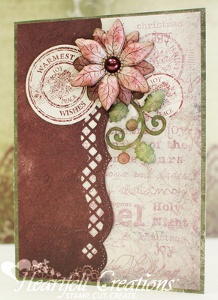
Holiday Script Poinsettia Card
Create a stunning new card in faded vintage Christmas colors with the Holiday Script Poinsettia Card tutorial. This gorgeous homemade Christmas card features a burgundy background and embellishments in shades of pink and green. With the help of a few die cut shapes and a gorgeous stamped background, this card comes together beautifully. Start crafting for Christmas as soon as possible! You can make an abundance of these charming cards for your loved ones, and they are sure to amaze everyone.

Materials from Heartfelt Creations:
- Holiday Script Background PreCut Set
- Christmas Poinsettia PreCut Set
- Christmas Sentiment Circles PreCut Set
- Holly Berry PreCut Set
- Ornamental Add On Die
- Sun Kissed Fleur Die
- Frosty Blanket Paper Collection
Other Materials:
- A2 Bracket Border 1 Nestabilities
- Nestabilities Circle
- Chianti Colorbox Ink
- Clear Heat Embossing Ink
- Black Ink
- Green Chalk Ink
- Brown Chalk Ink
- Sponge Daubers
- Pearl
Instructions:
1. Create a 5 x 7 card base from the Frosty Blanket Paper Collection.
2. Cut a 4 3/4" x 6 3/4" off-white patterned paper from the Frosty Blanket Collection and stamp the Holiday Script on the right side with Chianti Colorbox ink.
3. Add a burgundy side panel on the left using the Frosty Blanket Paper Collection and the A2 Bracket Border 1 Nestabilities.
4. Stamp one of the Christmas Sentiment Circles on this sheet on the top right. Stamp two more of the Christmas Sentiment Circles and heat emboss them with clear ink. Cut them out with a circle Nestabilities.
5. Stamp the Christmas Poinsettia on cream cardstock with black ink and cut them out with the Sun Kissed Fleur Die. Sponge color to the poinsettia with Chianti Colorbox Ink and brown chalk ink using a sponge dauber. Assemble the flower and then add a pearl in the middle.
6. Stamp the holly swirl with green chalk ink and cut it out with the coordinating Ornamental Add On Die and then sponge color in with a finger sponge dauber.
7. Assemble everything as pictured.
Your Recently Viewed Projects
Thanks for your comment. Don't forget to share!
Dibbers
Oct 10, 2015
Yeah, this would be a great card to make, if you can get the items that's listed. Went to their website nothing. So please beware. Need to use what you have or find someone who still has these items to make this card.
Report Inappropriate Comment
Are you sure you would like to report this comment? It will be flagged for our moderators to take action.
Thank you for taking the time to improve the content on our site.