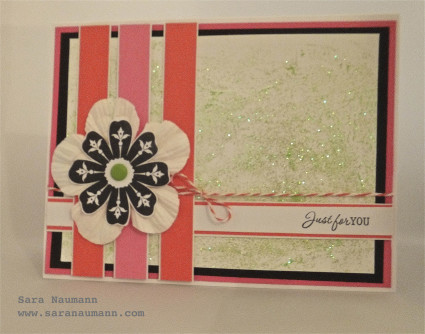
Vivid Textured Flower Card
This step-by-step Vivid Textured Flower Card tutorial will show you how to make paper flowers for your handmade cards. The flower card is vibrant and sure to put a smile on your recipient's face. The flower is made up of photo corners and you will use a die cut to create the curvy stem, which is a great contrast to the hard edges of the flower petals. As far as handmade card ideas go, this tutorial is awesome because it inspires you to create a unique and eye-catching card design that jumps off the page.

Materials:
- 3D Foam Hearts
- White Photo Corners
- Adhesives Sheets (4 x 6)
- E-Z Dots® Permanent
- 3D Foam Squares (Small)
Other Materials:
- Card Stock (4 x 6)
- Card Stock Card
- Tissue Paper
- Leaf Die Cut (Paper Smooches)
- Green, Red, and Pink Ink
- Circle Paper Punch (1.5 inches)
- Yellow Fun Flock
- Sentiment Stamp
Instructions:
- Scrunch your tissue paper for texture. Then apply the adhesive sheet to the card stock and pat the tissue paper down.


- Die cut two leaves from your card stock and apply green ink to emphasize the texture. This technique gives the leaves a realistic touch.

- Ink up some White Photo Corners with a red ink and then begin placing them on your pre-punched circle.

- Then, ink up some more White Photo Corners with pink ink. Add the pink layer to your flower.

- Continue alternating colors until you come to the center. Finish off the center of the flower with a 3D Foam Heart. Apply yellow Fun Flock to the heart.

- Stamp your card with your intended message. Adhere the leaves to the card using the E-Z Dots® Permanent. The dots only stick to the thin area of the leaves so there is no worry about visible adhesive.

- Lift a few of the leaves with 3D Foam Squares (Small) to add dimension. Adhere your paper flower to the card.

And you're done! Here is a close-up of the finished product:

Read NextOne-Sheet Printable Pop-Up Cards