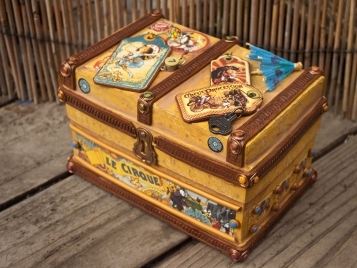
Mixed Media Circus Travel Box
Grab a chipboard box from your local craft store and get started on your latest mixed media project. The Mixed Media Circus Travel Box is a beautiful clay project that employs various mixed media art techniques. Give the box an element of wear by following simple tips outlined in this tutorial. Add lovely vintage tags with circus images to the top of the box and embellish the sides as well. This box is an excellent gift idea, and you can even put a little something inside. You won't believe how amazing this box will look when finished.

Materials:
- 2 Blocks of Premo! Sculpey®: Burnt Umber - 2 oz
- Clay Conditioning Machine
- Clay Extruder
- Sculpey® Style & Detail Tools, Set of 3
- Sculpey® Super Slicer
- Sculpey® Texture Wheel, with 4 heads
- Chipboardor paper mache box
- Selected colors of paint (Folk Art Yellow Ochre for the base, Nutmeg as the shadow and Cream for mixing the highlights)
- Small piece of sea sponge and a small foam brush
- Graphic 45 craft tags and paper for the circus
- Industrial Chic key and “7” dangle
- Tim Holtz Idea-ology key hole and brad
- Recollections colored brads
- White glue
- 18 gauge raw copper wire, wire cutters, needle nose pliers (NOTE: I also used a small piece of 20 gauge wire on the top for the beads)
- 1 tropical drink umbrella, colorful beads and whatever else you wish!
- 12 inches of 1x1 wood as a guide (a yardstick works also cut to about 12 inches)
- 12" metal ruler
Instructions:
Start with clean hands and work surface area. Good work surfaces include wax paper, metal baking sheet, or disposable foil. Knead clay until soft and smooth. For best results, clean your hands in between colors. Shape clay, pressing pieces together firmly. Bake on oven-proof glass or metal surface at 275 °F (130 °C) for 30 minutes per 1/4 in (6 mm) thickness. For best baking results, use an oven thermometer. DO NOT USE MICROWAVE OVEN. DO NOT EXCEED THE ABOVE TEMPERATURE OR RECOMMENDED BAKING TIME. Wash hands after use.
Begin by preheating oven to 275 °F (130 °C). Test temperature with oven thermometer for perfectly cured clay. For best results, condition all clay by running it through the clay dedicated pasta machine several passes on the widest setting. Fold the clay in half after each pass and insert the fold side into the rollers first.
1. Paint the entire box with the Yellow Ochre. Mix a small amount of cream paint into the Ochre to get a slightly lighter color. Pick up some of the color with the foam brush and brush it onto the sea sponge (this should not be a lot of paint on the sponge!) Daub across the Ochre surface, putting more paint onto the sponge frequently. (NOTE: Daub the sponge on a piece of paper first to remove excess paint.
A tip about painting the box - Select your middle tone, two slightly lighter tones and a shadow tone. Start with the middle tone and then build the highlights and shadows from the middle tone

2. Once the entire box is sponged, mix a little more cream into the Ochre to make a lighter color than you just sponged. Put a little of the Nutmeg color right next to it. Pick up BOTH colors on the brush and apply to the sponge. Sponge this combination over the entire box.

3. Use the foam brush to directly apply the same two colors to the shadow areas of the box detail and use your finger or dry brush to pull them out onto the box. You can also apply some of the Nutmeg by itself to the deepest parts of the shadow, remember to smooth or pull it out with your finger or brush.
4. Allow the box to dry thoroughly as you work on the clay and finishing elements.

5. Drill a small hole in the front center of the box lid to affix the key hole with the brad.

6. Roll the Burnt Umber through the Clay Conditioning Machine on the widest setting. Create a long narrow strip of clay. Place the strip of clay on your work surface and position your strip of wood on the top of the clay. Now just run the Texture Wheel down the clay, using the wood as a guide to help keep it upright and straight!

7. Remove the wood and use your Super Slicer and a ruler to trim the embossed clay strip. Create 3 strips.

8. Place the 3 strips on the top of the box, wrapping them down the front and back. Use white glue to secure them in place.

9. Make two longer strips to wrap around the edge of the box top. I kept the rough ends on the edges next to the keyhole to give the appearance of wear.
10. Use one more long strip to cover the front of the bottom edge and wrap it about ½ way on each side. The remaining sections of the sides are pieces together.

11. To create the metal corners, cut 6 inch sections of the copper wire and create tight pinrolls going in opposite directions. Fold these in half and secured them to the box with the brads (trim the actual brad to about 1/8 inch). Dip the brad in glue and press into place on the box. Repeat for all the corners of the box.

12. Roll the remaining clay through the Clay Conditioning Machine on the widest setting and place your larger tags on this sheet and trim to leave just a small edge of clay. Punch out the tag hole. Bake the box and the tags for 30 minutes according to the directions above.
13. Once the box is baked and cooled, you can begin to add your elements to the top of the box. (TOP: Lay these out before baking, take a picture and then bake the box. This way you can get things back to where you want them)

14. Glue the paper tags into place on the top and the umbrella. Wrap a small length of the thinner wire through the hole of each of the clay mounted tags and add some beads and baubles to them. Glue these into place also.
15. Antiqued the leather (clay) straps with a wash of a brown/black paint liberally watered down. As a final touch rub a little copper stamp pad ink on some of the strap surfaces.
16. Finishing the box - Select sections of the matching scrap paper to add to the front and sides of the bottom portion of the box. Glue these into place and anchored them with small dots of clay with brads embedded in them.
• Use a small cutter to cut out the same amount of clay for each.
• Roll into a ball.
• Press the Medium Style and Detail tool into the ball.
• Trim the back of the brad, dip in glue and press into place.
• Bake and glue into place on the edges of the paper.
• To highlight the long piece of Le Cirque paper on the front of the box, I extruded lengths of a half circle of gold clay and glued them into place after baking.

This is an image of the side of the box.