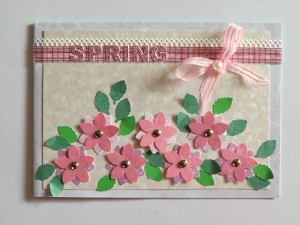
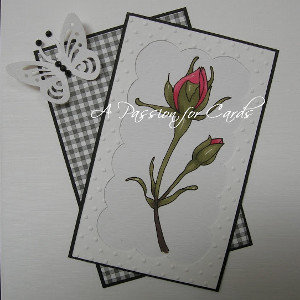
Celebrate Spring Card
Add a spring garden to the front of a card to celebrate the beginning of the spring season. The garden on the Celebrate Spring Card will remind the recipient that winter is finally over and nature once again is coming to life. Use the card to wish a friend a Happy Spring Day or just to share some warm wishes at the end of a cold season. This card would even make a great Mother's Day card or birthday greeting for a friend's springtime birthday. Welcome the warmer weather with a handmade card for spring.

Materials:
- A4-sheet of Gray Marbled Paper
- 5.2” x 3.2” Piece Cut from Worldwin Pearlescent Swirlette Cardstock
- 5.4” x 3.6” Dark Pink Sugar Paper
- Two Different Multi-colored Pink Scrapbook Papers
- Light Pink Sugar Paper
- Dark Green Sugar Paper
- Leaf-green Cardstock
- 0.2” Wide White Decorative Lace Tape
- 0.2” Wide Candy Striped Organza Ribbon
- Pink and Blue Square Grid Washi Tape
- 7 Small Silver Brads
- 1 self-adhesive 3mm Pearl Sticker
- Self-adhesive Pink Alphabet Gem Stickers
- Large Petal Palm Punch From Xcut, Code Xcu 261811
- Leaf-shaped Paper Punch
- Sewing Needle
- Pencil
- Ruler
- Pair of Standard Scissors
- Quick-drying Glue
Instructions:
1. With the longest side of the gray paper on the left, fold the A4 sheet of paper first from left to right and then from top to bottom.
2. With the first fold at the top and the second fold at the left, centre and glue the piece cut from the Worldwin Pearlescent Swirlette cardstock to the front of the card.
3. Punch 3 petal flowers from the one multi-colored scrapbook paper and 4 from the second multi-colored scrapbook paper.
4. Punch 7 flowers from the light pink sugar paper.
5. Use the needle to make a small hole in the centre of one of the sugar paper flowers. Push the brad prongs gently through the hole. Now make a hole in one of the scrapbook paper flowers and add it to the back of the sugar paper flower. Turn the flowers over and spread the
brad prongs apart on the back side. The brad will keep the flowers in place. Do the same with the other flowers.

6. Glue the flowers to the front of the card; four in the bottom row and three in the top row.

7. Punch leaves from the leaf green cardstock and from the dark green sugar paper.
8. Glue the leaves to the front of the card to complete the spring garden. Do not completely glue down all the leaves. Create a 3D-effect by allowing some of the leaves to curl back slightly.

9. Glue the decorative lace tape to the top of the card.
10. Add the Washi tape just below the lace tape, slightly overlapping the lace tape.
11. Use the pink alphabet gem stickers to spell the word “SPRING” on the Washi tape.
12. Use the organza ribbon to make a small bow and glue it in place in the top right corner of the card.
13. Add the pearl sticker to the knot of the bow.
14. Glue the 5.4” x 3.6” dark pink sugar paper to the inside of the card to write a message.
Find this project and more paper crafts to celebrate spring in our collection, Paper Crafts for Spring: 30 Paper Craft Ideas.