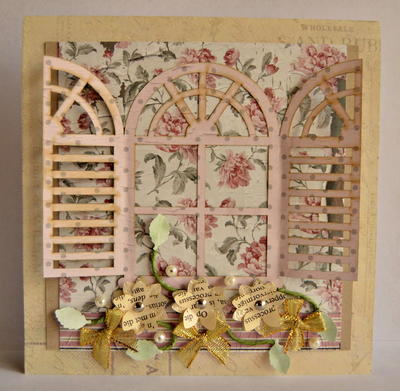
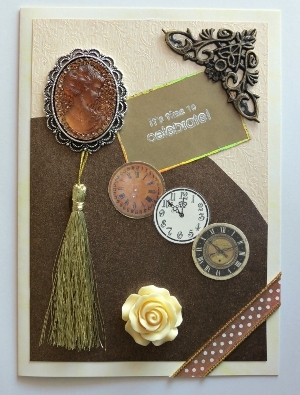
Time to Celebrate Vintage Future Birthday Card
If you're looking for awesome homemade birthday card ideas, check out the Time to Celebrate Vintage Future Birthday Card. Readers who are familiar with the steampunk style will particularly appreciate this project. This card features a modern twist to an old theme. Add a resin cameo and some additional embellishments that speak to both vintage and futuristic elements. Use a combination of metallic colors, and the end result will be a card that speaks of luxury and opulence.

A. Making the “it’s time to celebrate” note
Materials:
- 1.4” x 2.4” Rectangle Cut from Antique Bronze Colored Paper (*)
- Clear Stamp Phrase “it’s time to celebrate!”
- Clear Acrylic Block
- White Acrylic Paint
- Golden Craft Foil
- Foilart Super-tack Glue Pen
- Thin Paintbrush
(*) The size of the note will be determined by the size of the lettering of the phrase used.
Instructions for making the note:
1. Use the paintbrush to apply an even layer of white paint onto the clear stamp phrase. Press the phrase onto the piece of bronze paper.
2. Add Super-tack glue all around the note to make a “frame.”
3. Allow the Super-tack glue to dry for about 20 minutes. When the glue is wet, it is blue, but when it is dry it becomes transparent.
4. Press the foil down on the glue. Remember that - of course - the golden side of the foil must be on top.
5. Rub the foil over the areas where you have added glue with the Super-tack glue pen.
6. Carefully lift the foil. On the areas where you have added glue with the Super-tack pen, some of the foil will stay behind, thereby creating a golden frame all around the note.

B. Making the Card
Materials:
- Provided Pattern Sheet
- 10” x 7” Light Yellow Marbled Cardstock
- 6.4” x 4.4” Embossed Metallic Cream Colored Paper
- 6.4” x 4.4” Dark Metallic Copper Paper
- The “it’s time to celebrate” Note Made at a
- 1.4” Long Bronze Colored Resin Cameo with a Matching Alloy Base Setting
- Three 1” Wide Clock Pictures
- 1.4” Wide Bronze Metallic Photo Corner
- 3” Long Golden Medium Tassel
- Cream Colored Polymer Rose
- 0.3” Wide Brown Satin Ribbon with White Polka Dots
- Golden Twine
- Pencil
- Ruler
- Scissors
- Clear-drying Gel Glue (such as bostik clear gel)
Instructions for Making the Card:
1. Score the yellow marbled cardstock in half to create a card sized 5” x 7”.
2. With the fold at the left, center and glue the embossed metallic cream colored paper to the front of the card.
3. Use the pattern sheet to cut the dark metallic copper paper to the correct shape and glue it to the front of the card.


4. Glue the resin cameo to the alloy base setting.
5. Glue the note to the card.
6. Glue the photo corner to the top right corner.

7. Glue the tassel on the left, and glue the cameo in place over the tassel loop.
8. Cut out the three clocks and glue them to the front of the card. Add the polymer rose.
9. Leave the card on a flat surface to dry for a few hours. Do not pick it up until you are unable to move any of the objects when touching them.
10. Glue the ribbon diagonally over the bottom right corner. Glue golden twine above and below the ribbon. Cut off any protruding edges.
For more fun birthday card ideas, check out the 15 Homemade Birthday Cards collection.
Read NextHappy Birthday Fancy Fold Card
Your Recently Viewed Projects
Thanks for your comment. Don't forget to share!
Daughter of Light
Oct 30, 2018
This card reminds me of my daughter's love of steam punk. I'd never heard about it until she started delving into it! Since I try to keep an open mind about such things I found myself appreciating it to a great extent! I like the neutral colors found here. The darker brown card stock's curve echoing the shape of the cameo is lovely too. I have quite a few tassels from interior design sample books that this has given me ideas to incorporate them. A lovely card with much inspiration! Thanks for sharing!!!
Report Inappropriate Comment
Are you sure you would like to report this comment? It will be flagged for our moderators to take action.
Thank you for taking the time to improve the content on our site.