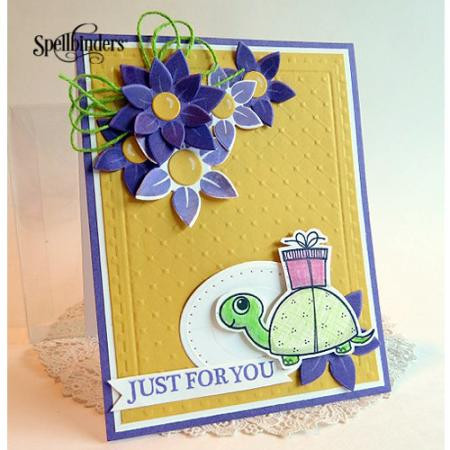
Cute Turtle Gift Card Holder
Looking for new paper craft ideas? Try out this tutorial and learn how to make your own gift card holder. This Cute Turtle Gift Card Holder is sweet and practical. If you are a fan of DIY card marking, you will love learning how to make this paper party craft. Achieve the thoughtfulness of a homemade card by making this adorable DIY gift card holder. As an added bonus, this cute paper craft is so precious that the recipient can keep and use it as piece of home decor.

Materials:
Spellbinders Supplies:
- SCD-007 Pierced Ovals
- SCS-005 Your Day
- SCSD-008 Just Because
- SCF-001 Framed Canvas
- SCP-017 Celebra'tions Assorted Solids (12 x 12")
- SCI-001 Berry Black
- SCI-009 Lovely Lavender
- SCT-Celebra'tions Linen Thread
- GC-003 Grand Raspberry Plate
- Spellbinders® Grand Calibur® Die Cutting and Embossing Machine
Other Supplies:
- Scrapbook Adhesives by 3L® - 3D Foam Squares
- Clear Acetate Box
- Paper Trimmer
- Scissors
- Low Tack Tape
Instructions:
- Cut a white card that measures 4¾ x 6”.
- Place a piece of 4¼ x 5½” Delightful Daisy cardstock in the Framed Canvas embossing folder, using the Raspberry Plate and the Grand Calibur Machine. Mat with a piece of 4 x 5” Whirl White cardstock. Adhere to card.
- For the flowers, stamp Flower 1 and Flower 2 images with Lovely Lavender ink on Whirl White cardstock.
- Then stamp Flower 1 and Flower 2 images with Lovely Lavender ink on Lovely Lavender cardstock. Place the coordinating dies over the images by securing them with low tack tape in the Grand Calibur Machine to cut and emboss. Cut out Flower Centers using Delightful Daisy cardstock circles for each to match. Assemble flowers together, arrange on card and adhere.
- Nest Pierced Ovals Dies # 1 and #2 (the smallest die is Die #1) on top of Whirl White cardstock to cut and emboss with the Grand Calibur Machine. Adhere to the bottom of card front.
- Stamp the turtle image from Your Day stamp set in Berry Black ink. Color and fussy cut the image. Adhere to card with 3D Foam Square for dimension.
- Stamp “Just For You” from Your Day set in Lovely Lavender ink on Whirl White cardstock. Cut ribbon tails on both ends. Adhere at the bottom.
- Tie a small bow with Luscious Green Linen Thread. Tuck behind the flowers on the upper left corner with glue.
Read NextParty-Ready Bunting