Today, Yesterday, Tomorrow Romantic Scrapbook Layout
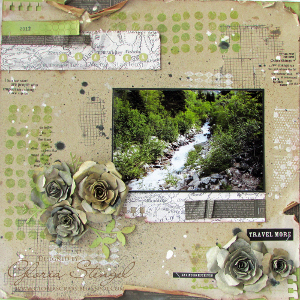
Romantic layouts don't need to be just for Valentine's Day or weddings! Create a timeless layout for your love with the Today, Yesterday, Tomorrow Romantic Scrapbook Layout. This gorgeous scrapbook page layout will look pretty in any scrapbook or as a framed gift. If you need a gift for your significant other, this is a wonderful way to show you care. Use beautiful 3D embellishments and flowers from Prima to achieve this look. Celebrate love all the time with a beautiful commemorative craft.

Materials from Prima:
- Rondelle Cottilion
- Almanac Collection A4 Paper Pad
- Romance Novel
- Eminence Collection
- Vintage Rusty Keys
- Alencon Collection
- Imagenne Stamp Set - Londonerry
- Comfort Craft Chalk Edger ink -Old Rose
- Donna Downey Mask Poppies and Peonies
- Comfort Craft Distressing Tool
Other Materials:
- Chalkboard Mist
- Molding paste
- Heat Tool
- Hot glue Gun
- Vellum Paper
- Stazon Black
Instructions:
-
Use Rondelle-Cotillion as your base. Randomly on the left side, stamp "her Beauty her smile her love" stamp with chalk ink in old pink. Adhere in the middle-left a half plastic doily from a flowers packaging. Use a palette knife to apply molding paste to the poppies mask on the top and the bottom of the doily. Let dry or use your heat tool.
-
Select and cut various pieces from Almanac A4 paper pad: victorian writing, polaroid frame, label, "je t'aime", "today yesterday tomorrow". Then cut a swirl from Rondelle-Pavanne, the others from Prima free downloading. Distress a few pieces. Adhere them as shown.
-
Insert 2 banners on the ring key. Set a small piece of lace around it. Adhere the ring key with a hot glue gun.
-
Spray the heart of the flower with water and then with pink ink. Use heat tool to dry it. Adhere the flower. Stamp 2 small butterflies and 1 large butterfly onto vellum paper. Cut these out and adhere them.
- To finish, with a palette knife add some gesso lightly. Add pink ink on the flower's left and photo's right. Adhere your photo and title.
Read NextAlaska Kraft Travel Layout