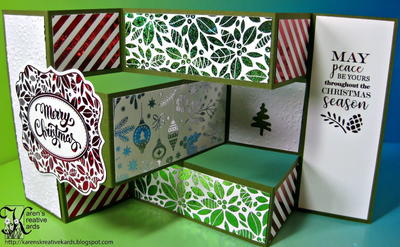
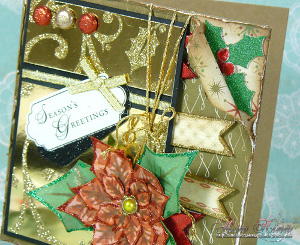
Poinsettia and Holly Season's Greetings Card
Celebrate Christmas by making stunning homemade Christmas cards! The Poinsettia and Holly Season's Greetings Card is an excellent project to start immediately. Use a wide variety of paper craft supplies to pull this card together. With the help of dimensional adhesives, floral embellishments, a stamped Season's Greetings tag, and a whole lot of glitter, this beautiful card will help the recipient have a magnificent Christmas. Start making these cards early so you can send them to all of your loved ones! A handmade Christmas card is so much more meaningful than a store-bought one, and this card is an impressive project at that.

Materials from Scrapbook Adhesives by 3L:
- MyStik Permanent Dispenser
- 3D Foam Pennants
- 3D Foam Christmas Mix
- Crafty Foam Tape
- BlackDodz
- SmallDodz 3D
Other Materials:
- Black Card Stock
- Main Decorative Panel
- BasicGrey 25th & Pine Collection
- Sparrow Mix’d Media Inx® Chox Inkpad
- Blending Tool
- Zoom Mess Free Glitter Sheets
- Clearsnap Chery Pie Designer Foils
- Spellbinders Layered Poinsettia Die Set
- ColorBox® Queties Inks
- Glitter Glue
Instructions:
1. Mat your main decorative panel onto a black card and adhere with MyStik™ Permanent Strips Dispenser. My decorative panel was saved from one of the last year’s cards. And did you know that you can personalize your MyStik dispensers?

2. Cut a panel as big as your card blank and a smaller one. Distress your chosen papers from BasicGrey 25th & Pine collection using a Sparrow Mix’d Media Inx® Chox Inkpad and a blending tool.
3. Roll one of the corners on the large panel. Adhere your papers onto your card blank with MyStick dispenser.

4. Peel of the holly leaves and berries from the 3D Foam Christmas Shapes sheet and cover with Zoom Mess Free Glitter sheets and Clearsnap Chery Pie Designer Foils.


5. Add the holly cluster to the top right corner of the card.

6. Cover a couple of 3D Foam Pennants with the Cherry Pie foil.

7. Run the MyStik over the wooden banner shapes from the 25th & Pine collection and adhere along the right edge of the card together with the foil pennants.

8. Add Crafty Foam Tape to the back of the decorative panel. Adhere to the card.

9. Die cut a poinsettia flower from the patterned papers using Spellbinders Layered Poinsettia die set. Sponge some Sparrow ink through the die/stencil.

10. Distress the edges with ColorBox® Queties inks. Stack the layers with DODZ™ – Small. Adhere the flower and leaves to the card with DODZ™ – 3D.

11. Add glue glitter to the flower and the banner elements.

Your Recently Viewed Projects
Thanks for your comment. Don't forget to share!
christinawbbr 0764 858
Nov 21, 2014
How in the world does one afford to buy all of the supplies to make? This card is BEAUTIFUL!! Would definitely create these! Thanks for this awesome idea!
Report Inappropriate Comment
Are you sure you would like to report this comment? It will be flagged for our moderators to take action.
Thank you for taking the time to improve the content on our site.